Build Your Dream Shed: Detailed Plans and Material List
Tired of clutter piling up? Dreaming of a dedicated workspace, a haven for your gardening tools, or a cozy retreat? Building your own shed offers a rewarding experience and a customized solution to your storage needs. This comprehensive guide provides detailed plans and a complete material list, empowering you to embark on this fulfilling project. We'll walk you through every step, from laying the foundation to hanging the door, ensuring you have everything you need for success.

Foundation: The Solid Base
A strong foundation is paramount for a long-lasting shed. We'll focus on a simple, yet effective concrete slab foundation. This offers excellent stability and protection against moisture. Begin by marking out the dimensions of your shed (we'll use a 10ft x 8ft shed for this example) and excavating the area to a depth of 6 inches. Compact the soil thoroughly to provide a stable base for the concrete. Next, create a formwork using treated lumber, ensuring it's level and square. Remember to install rebar for added strength. Finally, pour the concrete, ensuring it's evenly distributed and level. Allow ample time for curing (at least 3-4 days) before proceeding to the next stage.
Materials for Foundation:
- 6 bags of concrete mix
- Treated lumber (2x4s) for formwork
- Rebar (1/2 inch diameter)
- Level
- Shovel
- Wheelbarrow
Framing: The Shed's Skeleton
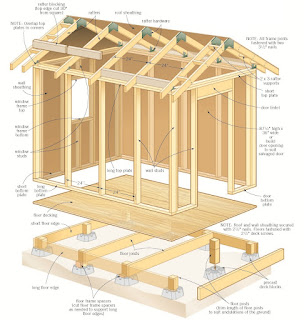
The framing provides the structural integrity of your shed. We'll use pressure-treated lumber for durability and resistance to rot. Begin by constructing the floor frame, using 2x6 pressure-treated lumber. Ensure the frame is square and level before attaching the floor sheathing (OSB). Next, erect the wall frames, using 2x4s, ensuring proper spacing for windows and doors. Once the wall frames are complete, carefully lift them into place and secure them to the floor frame. Construct the roof trusses (or purchase pre-fabricated trusses for ease) and place them on the top of the wall frames, creating a sturdy, sloped roof.
Materials for Framing:
- Pressure-treated lumber (2x4s and 2x6s)
- OSB (Oriented Strand Board) for flooring
- Roof trusses (or lumber to construct them)
- Nails (various sizes)
- Level
- Framing square
- Hammer
Exterior Cladding and Roofing: Protecting Your Investment
The exterior cladding and roofing shield your shed from the elements. We recommend using vinyl siding for its low maintenance and attractive appearance. Start by attaching the vinyl siding to the wall frames, following the manufacturer's instructions. For the roofing, use asphalt shingles, which are durable and cost-effective. Begin by laying down underlayment, followed by the asphalt shingles, ensuring proper overlap for water resistance. Secure the shingles with roofing nails. Remember to install flashing around any protrusions such as vents or chimneys.
Materials for Exterior and Roofing:
- Vinyl siding
- Asphalt shingles
- Underlayment
- Roofing nails
- Flashing
- Siding nails
Finishing Touches: Adding the Details
The final touches transform your shed from a structure into a functional space. Install a sturdy door and windows, ensuring they're properly secured and weathertight. Add interior sheathing (plywood or drywall) to create a finished interior. Consider adding shelves, workbenches, or other features to suit your specific needs. A final coat of paint not only enhances the aesthetics but also provides additional protection. Remember to consider adding proper ventilation to prevent moisture build-up.
Materials for Finishing Touches:
- Exterior door
- Windows
- Interior sheathing (plywood or drywall)
- Paint
- Shelving materials
- Hardware (hinges, handles, etc.)
Building your own shed is a rewarding project that provides lasting value. By following these detailed plans and utilizing this comprehensive material list, you can confidently create a functional and aesthetically pleasing addition to your property. Remember to always prioritize safety and take your time. Enjoy the process!